It has been a while since I first started the demo work on Red Rover’s electronics. I am just now posting the install/completion story, not that we just finished it up, but we have had our nose to the grindstone working to prepare for our trip to Alaska. I am starting this story while having a cup of coffee in the pilothouse looking out over the marina in Ketchikan. Looking back over the last week of coming up the west coast of Vancouver Island from Seattle, we appreciate the upgrade more than ever. Our first outing with the upgrade six weeks ago was definitely information overload vs what we had before. But now as me are getting a handle on what we can pull up when it is needed, we truly understand the value of the tool we’ve just brought on board. The other reassuring thing that I am noticing (again) is how many of the commercial/charter ships in this harbor have Furuno equipment installed. No kidding, at least 95% of what is mounted is Furuno. Reassuring on the choice of manufacturers.
Once I had 90% of the old equipment removed, Brad with Emerald Harbor Marine had a fairly clean slate to start working. He first set out to clean up the power runs and pull new power for all the new equipment. He also tidied up the 120v power that was behind the dash.
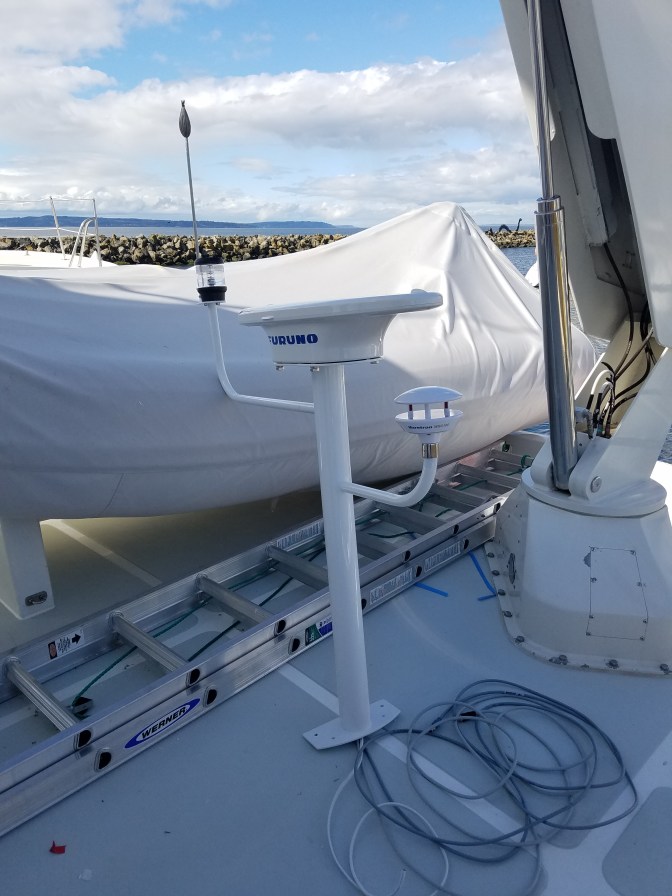
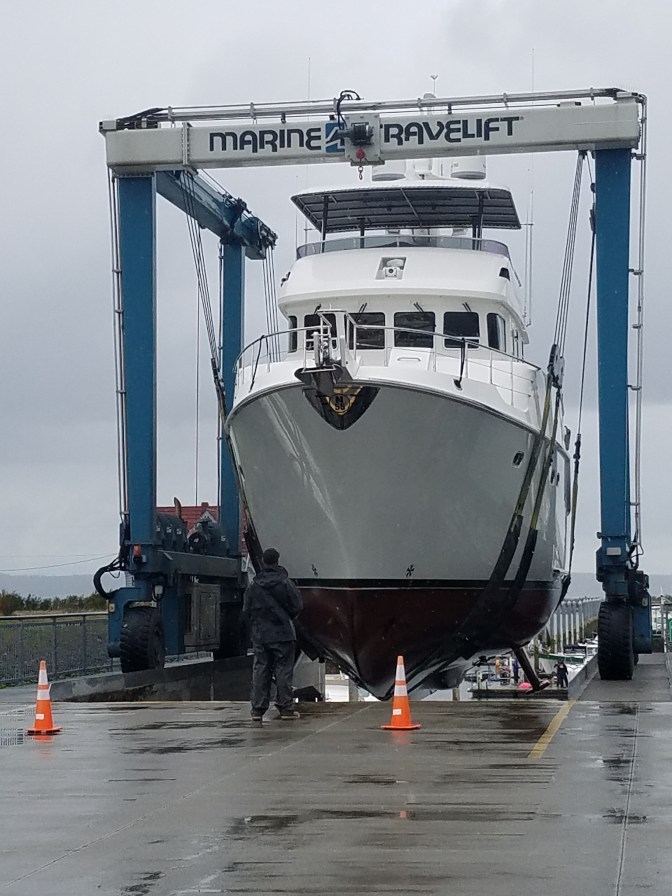
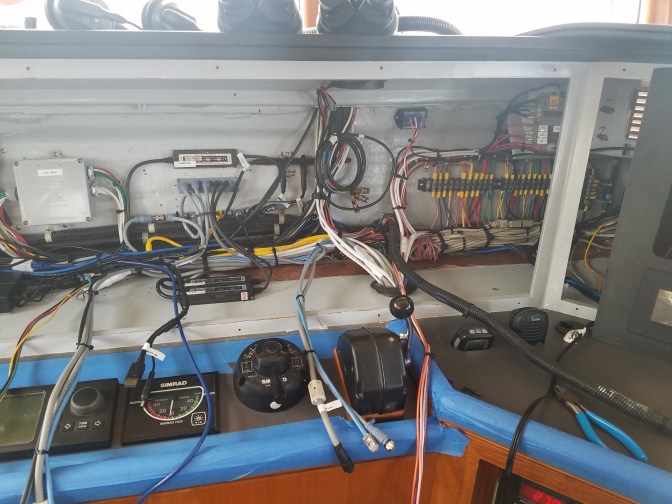
I cannot say how impressed I am with the knowledge Brad has about boats. I learned just an immense amount of things from the time spent working with him.New power block for Red Rover’s audio system120v circuit all cleaned up.NEMA 2000 Backbone going in. The black NEMA cables to the right are what I used to install the Fusion audio system last year. The two systems are completely separate.I wanted to put the Xantrex inverter panel up on the upper dash so I needed to splice the cable, the only way to do so was cut and crimp 25 very small wires…Audio power!So many cables but really so many less than what was there… and they are becoming so organized!The power source for the 12kw radar and the AIS class B box mounted under the port side cabinetryZoe, holding down the fort. She can’t wait for the electronics to be installed!So many boxes, cables, parts and everything else!The first vision of how it will look… getting excited!These are my .25″ black PVC test panels that I routered out to make sure all my patterns were correct. Just a few slight adjustments were needed.Do they fit?Brad ad Scott with Emerald Harbor lit up the two TZT2 MFDs while I was at work… what a pleasant surprise!Really starting to understand what we are going to have…Upper dash.Flybridge dash just before I completely tore it apart…All the old dash panels back at my shop. I used each one to pattern new dash plywood panels.Old panels next to the new oversized plywood rectangles blanks. I affixed the old to the new and used a hand router to trace route new blanks.Once the new blanks and the plastic laminate was glued up, each panel was put on the CNC router table and the holes for the equipment cut out.I love my tools at work…All dash panels – ready to go to Red Rover for install!Test fit the panels – some needed just a little adjustments…Ok, now we are getting somewhere! Don’t mind a few fingerprints…Are you done yet? I want to go somewhere!This VHF eventually made it’s way up to the flybridge as the white vhf up there was too much to handle. A new IC-M602 when in it’s place for our main PH vhf.We originally had two FI-70 displays ordered but decided to add two more. I am glad we did as we use all of them underway. I have room to add two more as desired above the vhf.Mount for the vhf.Wire rope was used to hold up the upper dash when it is open.The FI-70 needs only a NEMA cable for power and data.Lower right dash panel ready to go in…The audio cable mess is now all cleaned up!So tidy! Such a difference from what we found when we first opened up the dashes.More tidy cables!Behind the port side lower dash.The Maretron engine data conversion box is in the upper middle of the photo. This dates the engine data and pumps it into the NEMA backboneThe new mast to hold the satellite compass, all around light and the Maretron weather station.The new mast with equipment mounted up.Ready to go up!Getting ready to install the new mast. New LED boat decks lights are installed. The IP camera is ready to be mounted too.Looking good Brad!35 feet up? No worries!Dashes taking shape!The 19″ center screen and the one on the right are ELO Touch screens and the other two are the Furuno MFDs.Backside of the one of the Tankwatch displays.I found the drawings for the original equipment build, circa 2005.Alison wouldn’t allow me to install these antennas…Ready to head up to Everett to haul out. Two new transducers will be installed.Wow, nice to see it come back together!On the way to Everett, we had the autopilot loose data from the chartplotter many times. We originally opted to keep the autopilots as it was thought they would integrate ok with the new equipment. A different NEMA 2000 to 0183 converter was installed (Actisense) which cut down the errors by 95%.On to Everett.The Furuno TZT2 MFDs can show a multitude of information in single/split/three screen views…
Zoe assumes her position in the corner and Brad bathes her in love…I thought we’d be done with this project by now…Haul out at Everett.
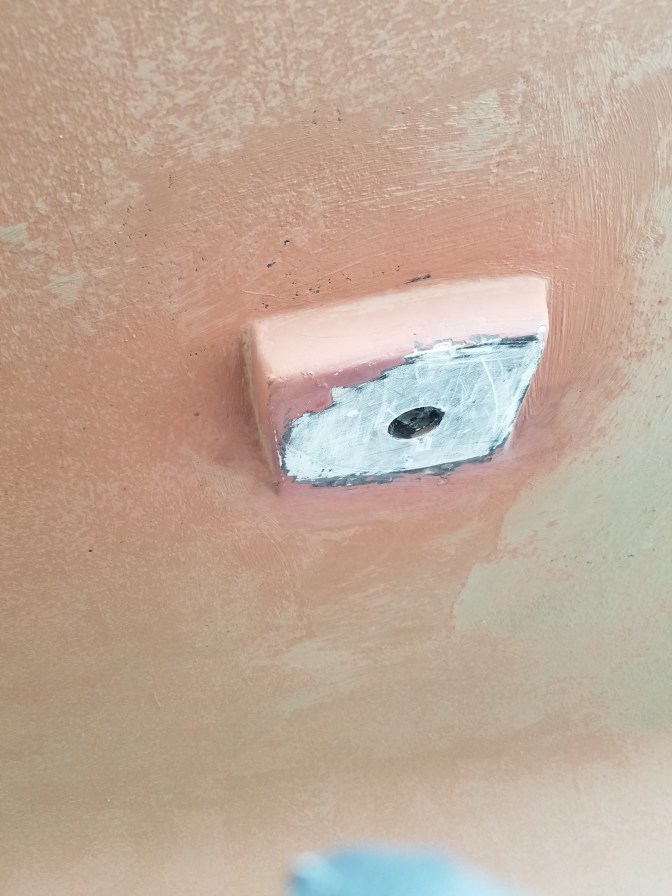
Just shy of 130,000 lbs.Port transducer access…Come on out…Mind over matter…Port side ducer removed.
Starboard side ducer going in…There is some fiberglass…
Let the sealant cure and some bottom paint time!
Flybridge dash nearly complete.Main dash panel backside. They came out to do final wrap ups and ready to go back in.
So clean!
Now we’re talking!Sea trials included Autopilot adjustments.This is our Samsung tablet that picks up a wifi connection from one of the two TZT2s… The downloaded app allows you to view and control the MFD remotely. I was able to have this next to me in the stateroom while I was resting and others were on watch.The wiper control unit – I had to take off 15 wires to install the unit in the dash and then put the wires back on… don’t mix them up!This was Saturday morning just after we departed for Alaska. We’ve really enjoyed them on our trip.Night view of the electronics… they were dimmed even further for night visibility.Upper dash as it looks today.
Lower dash as it is today.
To wrap up, I am glad that I was as involved as I was for this upgrade. I learned an huge amount about wiring, Red Rover’s hidden areas, the electronics packages inside/out and what modern day navigation equipment is all about. I enjoyed the work and look forward to using/learning more about our new tools as we explore SE Alaska.
I would also like to give a shout out to Larry, Brad and Scott with Emerald Harbor Marine (again). They were more than open in allowing me to assist with the project. They gave great advice throughout the project. And what was stellar was I received multiple calls/texts/emails from each of them leading up to our Alaska departure as well as communications from them during the trip seeing if we needed anything, had questions or any issues. I have no doubt that they would bend over backwards to assist us with anything that popped up (with the new system or any other issue that could arise). We will be updating the autopilots sometime after we return to Seattle, probably early winter. This should be a pretty straight forward project compared to what we just completed.
So interesting! I’m generally allergic to electrical/electronic stuff, so though much of this went over (over!) my head, I can appreciate the transition. I loved the photos of Zoe, and the Samsung tablet that you can take to your stateroom!


Epic post! Thanks for documenting this project!
So interesting! I’m generally allergic to electrical/electronic stuff, so though much of this went over (over!) my head, I can appreciate the transition. I loved the photos of Zoe, and the Samsung tablet that you can take to your stateroom!